Foto: Adi Schleipfer
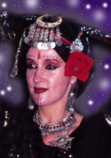
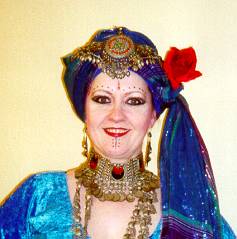
Shahrazad
Foto: Adi Schleipfer
From
Shahrazad's homepage (thank you!):
Some 30 years ago, a dance style developed in California with dance and music aiming at conveying the impression of very old, traditional oriental tribes.
The costumes consist of nomad dresses from various countries, worn with an enormous amount of handmade silver jewelry from Afghanistan, India, Morocco, Egypt and Turkey.
Nowadays, this style has become a popular phenomenon with a fixed repertoire of steps and regulations allowing groups to improvise.
Like the costume, also the dance itself is a blend of elements taken from various countries and styles. Mostly, there is a very slow, mystical entree, followed by a faster part with the dancers playing cills and sometimes using sword and veils.
End of quotation
Here are some interesting links concerning Tribal Dance:
Fat Chance Belly Dance, the famous group in the US
Read my hips, a groupt from Chicago
Nesimah's Tribal Stamm was one of the first German groups, and their homepage features many details concerning the costume parts
Amira Mona has studies Tribal in US .....
... and there is a separate Tribal homepage by Amira Mona
Also Tanz-Oase offers some valuable Tribal Tips
New:
Turbans, Tassels and Tattos - Tribal hints from australia
Tribal Dance is very popular now, and we ourselves have a lot of fun practicing it. A wonderful energy is quickly arising within the group, getting the more intense the longer you dance together. It is exciting to feel how quickly the group tunes in with the respective leader and her specific movements, and how the group absorbs and amplifies that energy.
I love the proud posture and the tension, but it requires an exact technique and again and again many stretching exercises for the back.
It takes some time to get everything together for the complete costume.
The Turban
Most impressing in the beginning is the turban which, however, is not so difficult to wind. We need a piece of cloth, 90 to 110 cm (35.4 - 43.3 inches) wide and 4 - 6 m (13.1 - 19.7 feet) long. Best is a non-slippy material, as cotton.
Now comes the trick: you know these elastic knitted tube-like scarves? Well, take it off the winter box! Wrap such a scarf 3 times around your head, and there you have the basis.
And here comes another excellent hint from Salma of OW-Forum (thank you!):
She says: I have learnt in a cancer self-help group how to wind a turban: you pull black cotton leggins over your head, wrap and knot the legs, then another cloth around it, as for a turban.
On this basis you make the turban. Slightly twist the end of the cloth and start at one side (maybe letting one end hang down in the back) and pull it straight to the other side of the head, continue winding with focussing on the sides, not on the top.
Pull the cloth very tight and fix the end well down under the turban.
You need some practice, so have someone help you in the beginning and look into the mirror, then try yourself.
In the middle on top you can fix a big piece of silver jewelry. And wear big ear rings!
The Skirt

Here come some suggestions for sewing a skirt.
If you can contribute new ideas, go ahead!
There are several ways to sew a Tribal Dance skirt:
a circular skirt or one made up of straight parts.
A circular skirt has less volume "puffing" up the hips, one with straight parts is easier to sew.
You can use 1 or 2 flounces, there is no rule for the length, it is up to you.
The skirt is often black, but can also be colored, or you wear a black skirt with a red top and red Turkish trousers, for example.
But it is always reasonable to buy a more expensive crease-resistant material, as I don't like ironing flounces!
I have fond inexpensive and absolutely crease-resistant synthetic material in an indian shop.
In most cases, the skirt length will be around 90 - 100 cm (35.4 - 39.4 inches). Now you have to decide on the length of the flounces, maybe 20 - 25 cm (8 - 10 inches) long? That would mean 50 cm (20 inches) length with 2 flounces, and the first part of the skirt would be 40 - 50 cm (16 - 20 inches) long (consider the tunnel for the elastic). You can also cut three parts of the same length, i.e. 33 cm (13 inches) each (plus allowance for the elastic tunnel).
For a circular skirt, 2 half circles are sufficient. The smaller hip cut-out has to be adapted to the hip circumference (that thing with "Phi"): with 2 half circles, the smaller hip cut-out should have about 30 - 32 cm (11.8 - 12.6 inches) diameter, that is a circumference of 95 -100 cm (37.4 0 39.4 inches), which should be wide enough for entering. Sew the half circles together. Now use a straight piece of cloth for a tunnel that you sew on top of the upper small hip cut-out. That is easier than trying to make a tunnel of the circular piece of cloth.
According to my experience, each circular skirt tends to get longer and uneven with the time in its diagonal parts. Therefore: Before you sew on the flounces, leave it hanging for a few days, then check the length and cut the fabric, if necessary.
The necessary amount of fabric can be calculated as follows:
At a length of 50 cm (20 inches) and a radius of 15 cm (5.9 inches) for the hip cutout we have 65 cm (25.6 inches) length, multiplying by 3,14 makes 2,04 m (80.3 inches, 6.7 feet), double the two half circles = 4,08 m (160.6 inches, 13.39 feet).
So the upper circle has a circumference of about 4 m (13.12 feet). Then the first flounce should have a width of 8 m (26.25 feet) and the second one 16 m (52.5 feet). Therefore we need 24 m (79 feet) flounces of 25 cm (9.8 inches) heights plus the fabric amount of the two half circles.
For a straight skirt you can calculate the amount of fabric easier:
The upper part has 3 m (9.8 feet) width. Then the first flounce has 6 m (19.7 feet) and the second one 12 m (39.4 feet).
At a fabric's width of 150 cm (59 inches) you need 4 m (13.12 feet).

If the fabric has a width of 112 cm (44.1 inches), you need 6 m (19.7 feet).
The flounces are seamed and closed to a circle.
Now comes the difficult part of work: the flounces have to be crimped in small folds. You can pin the folds by hand, or you can use a very wide straight stitch to apply a "crimping thread" which you pull and pull until the crimped cloth has reached the desired length (as you know from the curtain ribbons with a string that you can pull to crimp the curtain.)
Meanwhile I developed a quite simple method:
For the fabric that needs to be crimped set a mark every 1 m (39.4 inches) on the left side (with tailor's chalk) and sew a thread with the machine with the longest possible stitch length.
Therefore I always sew the beginning and let the threads hang at the end. Then overlap a little to the back and sew the next meter of yarn - and so on.
On the counterpart a mark is set every 50 cm (20 inches) on the right side.
Now put the two parts "right side on right side" on each other, the crimping thread is on the upper side. This works best if the fabric is lying on your knees. Now put two of the marks on each other on your left knee and pin them. Now look for the end of the first crimping thread on the right side and start fastening the fabric carefully and evenly together. This is a quite manageable length.
Pin these 50 cm (20 inches) on the lower fabric and crimp the next meter. After about 3 m (9.8 feet) I sew the flounce carefully together with a tight stitch and crimp the next 3 meters (9.8 feet).
In the meantime that works really fast.
It is just annoying, if the crimping thread tears - so please be very careful at drawing.
New: Dazu ein prima Tipp von Karen Kiesle (Danke!):
Wenn man den "Kräuselfaden" doppelt näht, so mit einem halben Zentimeter Abstand, und die beiden Fäden zusammen beim kräuseln zieht, dann können sie nicht so leicht reißen und man kann zwischen den beiden Nähten super steppen.
Now only the upper tunnel must get sewn and furnished with an elastic band - and then you can get started with dancing!
Mostly I sew a separate tunnel 150 cm (60 inches) wide and crimp the upper part of 3 m (9.8 feet) together to the tunnel wide of 150 cm (60 inches). So you don't have so much volume directly on your hips.
The Turkish Trousers/ Harem pants
Now you need Turkish trousers! They should be as wide and puffy as possible. The material should be crease-resistant, non-transparent, and relatively thin. In an Indian shop I found a flowing polyester material for less than 5 per meter.
To avoid too much volume around the elastic, you can use a little trick: cut a 20 cm (7.9 inches) long piece of cloth, approx. 20 % more than the hip circumference. Sew a tunnel on top and fix the legs to the lower edge.
The legs can be as wide as 150 cm (60 inches) each. The length should be at least 20 cm (7.9 inches) more than necessary, the final length will be determined later.
Now you have this straight piece of cloth and the two legs. Sew the legs together, but not up to the very top, then gather them in small folds and sew them onto the straight strip. Difficult to explain some prefer to use a gathering thread, others prefer to pin folds.

It is recommendable to start at the outside and to work towards the middle in the front and in the back. Before you reach the end, you have to combine the two legs. Explaining this is more difficult than doing it. First, measure roughly, between the legs, the distance from the middle of the front of the wide waist and the middle of the back. Divide this length by 2 and sew the legs together in the front and the back for that length, thus forming a gusset with the seam of each leg.
Now pull the trousers on and hope the gusset does not "bite" you; if so, simply open the seam a bit and leave more space.
Now, you should sew two narrow (2 cm (0.8 inches) wide) tunnels and pull 2 pieces of elastic through them. Then you can choose: for a stable closure, leave both eleastic strings as they are, that prevents the trousers from touching the ground while you are whirling, but if you wish to have this effect, fold back the lower elastic.
One single elastic is also OK, for me it was too much cloth for 2 pieces of elastic.
Some trousers from the US were enhanced in the lower part, so that the legs would puff up a lot during whirling. I don't know whether this is necessary or how it is done exactly.
The Belt
The belt can consist of various materials, some have integrated mirror sequins. In the meantime, ready-made belts are available. Or you find an Indian skirt or pillow case and take this as a triangle.
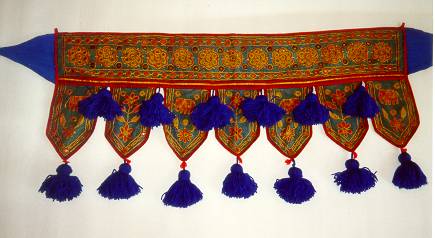
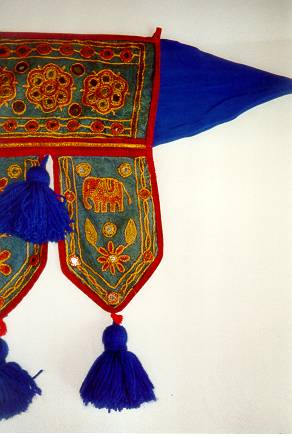
In an Indian shop we found a kind of window decoration, 1 m (39.4 inches) wide, with embroidery and integrated mirror sequins. It is 15 cm (5.9 inches) high and has 7 leaf-shaped, 20 cm (7.9 inches) long extensions. For closing, simply sew a kind of cord on the right and left side and cover the knot with a large piece of jewelry. Or combine two nice belt buckles with a fastener.
This design almost invites for placing the tassels, doesn't it?
Here comes a photo of my belt, made from an Indian window decoration, as explained. I added the blue ends for making a knot, covered with a big ornament.
The number of tassels will increase.
The Tassels
Tassels are very useful as belt decoration, and you can easily make them yourself.
There are two kinds: the ball-round "pompons" (somewhat more complicated) or the simpler tassels, which are tied on the top (I hope you know what I mean!)
First you get the wool, simple acrylic crochet yarn in the desired color(s). You need at least 4 bundles, maybe of different color.
For a "pompon" you need two discs of cardboard with a hole in the center. The size of the cardboard corresponds to the size of the pompon. Then you wrap the yarn around, always inside out, inside out... best with a thick needle. When you feel it is thick enough, cut all threads along the outer edge (pierce with your scissors between the discs). Now handle the whole thing carefully, and tightly bind the pompon with a thread between the two cardboard discs. Pull off the cardboard, - and there you have the first pompon.
The tassels are much easier:
You take 2 pieces of stiff cardboard or plastic of the length desired for the tassels, even a CD or MC cover. If your template consists of two pieces, first insert a string between the two parts with the ends hanging out on the right and left side. Now wrap the yarn all around until the tassel is thick enough and you cut it. Now tightly pull the string together at the loose ends and cut all threads with a sharp knife. Now make a tight knot and tie the tassel together in 3 - 5 cm (1.2 - 2.0 inches) height. You can decorate this with a nice lace, if you like.
Fix single tassels or pompons on a cloth or belt, or combine them in strings of 2, 3, or 4. Be sure to fix them by a thread so that they don't get messed up.
You can place them in any pattern you like: triangles, rows, assorted according to color, in one or two lines. Follow your phantasy!
I compiled these tassel hints with the assistance of Shahrazad, Ulrike and Gabriella from OW Forum (thank you!), plus based on my own experience.
The Top (Choli)
The top is mostly a kind of blouse made from elastic velvet. It has 3/4 or 7/8 sleeves, a round neck and is gathered in the middle of the chest. Below your breasts you can use an elastic.
Ready-made tops are available, often with a free back.
You can sew such a top yourself for little money, with some courage, a T-shirt as template and a lot of trying, cutting and trying.
If you have a big bra size, leave a hole under your arms so that the top does not move upwards when you lift your arms.
Now wear a lot of jewelry, the more, the better! A "strangler" around the neck is obligatory, also many braclets.
Often, a bra with coins is worn above the top. It only consists of the cups and is tied in the neck and in the back, so it does not really look like a bra. You can make it yourself either with single coins (a lot of work) or you look for suitable necklaces, which can be adapted easily.
Tghe Make-up
To the normal stage make-up with strong highlighting of the eyes (eye brows!), intense rouge and brilliant-red lip stick, you add a bindi on your forehead and a dark line around your lips (grey/black).
Now imitate some tatoos, for example: draw a line with a black kajal through the middle of the lower lip down to the lower part of your chin.
Then add 3 thick spots on each side of the line by placing the kajal stick on the skin and then twisting it.
Paint black spots above the eyebrows in even distances, starting from the middle to the side, you can add an angle next to the corner of your eye (drawing to follow!).
And you can decorate your navel either with kajal or real henna (integrating a piercing)
Copyright © 2000-2012 by Nadya - All rights reserved.
Last modified: